This week in our Customer Appreciation Summer we are adding the ability to sort issues, equipment, field observations, and reviews by when they were last updated. This new sort is called “Date Updated”.
An item will be considered “updated” not only when it is edited, but also when files, issues, or comments are added to it. The exact rules controlling the updated date for an item can be found in a new help article.
A forthcoming update to the iOS app will also include this new sorting option.
We know you want to see this same sort for checklists and tests and we are working on it. To get that one right – which we believe means accounting for answers to individual lines – we need a little more time.
This week’s feature in our Customer Appreciation Summer is another top request. You can now apply status restrictions to not only the setting of a status, but also to the un-setting of that status. In other words, once you set an issue to “Closed” (for example), the only people that can change it away from “Closed” are the people that are allowed to set “Closed” in the first place.
This feature is opt-in. If you’d like to turn it on, navigate to your status configuration in project settings and click “Permissions” next to the status you want to restrict. Then check the new “Also restrict unsetting this status” checkbox.
This new option is available as part of your account-level project defaults as well.
This additional restriction will be enforced in the iOS app starting with version 3.4, which we just made available.
While we were making changes to the status permission dialog we also added tooltips that better explain what each option does.
This week’s feature in our Customer Appreciation Summer is for data geeks. You can now export key data – issues, checklists, and tests – from across all projects.
Unlike our project-based exports, which present the exported data similarly to how you see it in the software, these account exports are tailored more towards those looking for “raw data”.
For example, these exports include the numerical IDs that the software uses to uniquely identify each record. You’ll also notice that we split up the exports into their underlying pieces. Rather than a single test export, for example, there are instead three exports: Tests, Test Attempts, and Test Attempt Lines.
In keeping with the “raw data” approach of these exports, you can choose between CSV and SQLite formats. CSV (Comma Separated Values) is a simple spreadsheet format that will open in Excel and other spreadsheet programs, while SQLite is a common database format. You may need to download additional software to open the SQLite file.
When exporting to a SQLite file you will always receive a single file. When exporting to CSV you may receive multiple files if the export is large, as we have limited a single CSV file to 50,000 rows.
The exports are only available to account administrators and can be accessed under the new “Export” tab within your accounts.
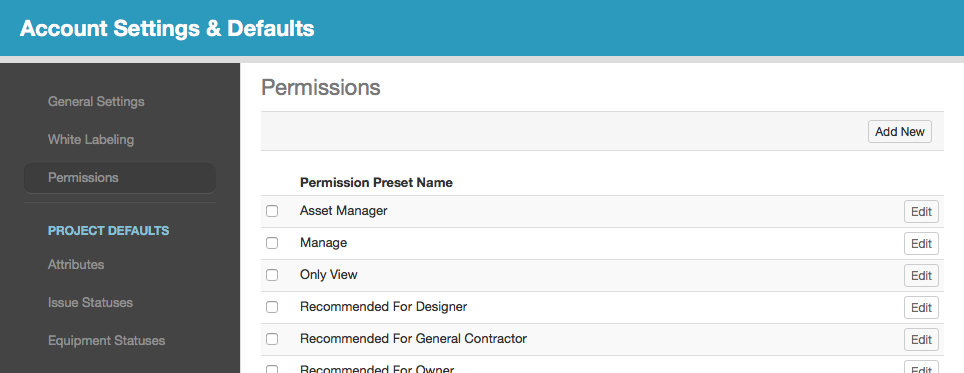
This week’s feature in our Customer Appreciation Summer is one that we’re really happy to make available – custom permission presets.
Since we first introduced our more granular permission model in 2012 and its somewhat intimidating array of checkboxes, we’ve also provided some presets to save you the hassle of clicking all those little checkboxes. Presets are intended to save you time; they check the boxes for you.
Previously the available presets included some basic setups, such as “View Only”, as well as some recommended configurations, such as “Recommended for Subcontractor”. These were helpful, but they couldn’t be renamed or changed, and you couldn’t create your own. That changes with this week’s release!
You’ll now find a new “Permissions” section in your Account Settings. As a part of this release, every account starts with the default presets we’ve used for years (”Recommended for Subcontractor”, etc.). The difference is that you can now create new presets and edit or delete existing presets.
Presets are configured exclusively at the account level; you can’t have project-specific presets.
The presets appear in the same place they always have when adding a person to a project, except that now you’ll be choosing from your list of custom account presets.
Of course, you can always tailor the permissions to each individual user and nothing about that changes with this release.
This week in our Customer Appreciation Summer we are adding the ability to export the list of people on the project. The export will include three worksheets: People, Companies, and Roles.
With this release, we are at the halfway point in our customer appreciation summer. To recap, in the last five weeks we have added these features:
If you’ve ever taken a screenshot of the project dashboard, this week’s feature is for you. For the fourth week of our Customer Appreciation Summer, we are adding PDF and export options to the project dashboard overview.
It’s pretty simple – just click one of the new “Export” or “PDF” buttons at the top right of the dashboard overview. We’ve also added “Dashboard” as a section you can include in the report generator.
We’d like to have exports and PDFs for more of the dashboard in the future, so let us know what other dashboard information you’d like to see included.
A small but useful feature for the third week of our Customer Appreciation Summer: batch changing test statuses.
To use the feature, simply select one or more tests in the list, then click “Set Status of Most Recent Attempt” in the action bar that appears above the list.
As you may have noticed, technically you’ll be setting the status of each test’s most recent attempt. A test can have many attempts and this feature will only change the status of the latest attempt. Because the overall status of the test is pulled from the latest attempt, changing the status of the most recent attempt will also change the status of the test overall.
It’s a small feature but one that can save you a lot of time when you need it. We hope you enjoy it. See you next week!
It’s week two of our Customer Appreciation Summer, and we’ve got a great one – you can now include a Table of Contents when generating reports!
Our report generator has always included automatic bookmarks so that you can easily navigate around the document. These bookmarks are only available when viewing the PDF digitally, though. With the new Table of Contents section, you can now include a table of contents in the report itself. This can be really handy with printed copies, and it’s also useful for PDF users that are less experienced and may not know how to use PDF bookmarks.
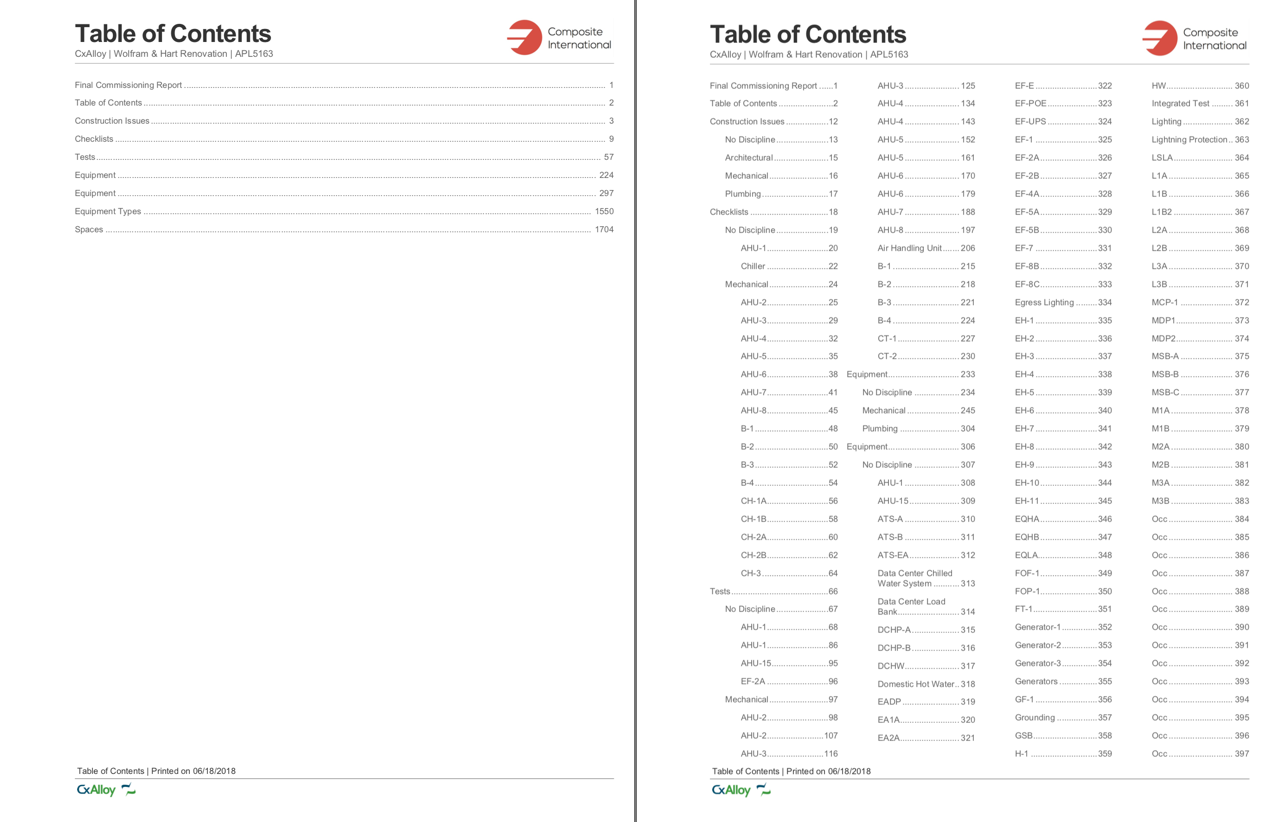
To add a Table of Contents simply select it from the available sections in the report generator. You can give the Table of Contents a custom title, choose how many columns to use, and what level of detail to provide. This allows you to go from a simple chapter-style listing to an almost index-like approach. It’s probably easiest just to see what these different options look like:
On the left, a table of contents with one column and only showing top-level sections. On the right, that same table of contents showing three levels of organization using four columns.
As our customer appreciation summer rolls on we’ll keep bringing you great new features you’ve been asking for. We hope you like it!
When a customer makes the decision to use CxAlloy TQ they are not only investing in the CxAlloy TQ of today but also what it will be in the future. We understand that, which is why we are always trying to make the software better, whether that’s performance improvements, major new features, or even significant reworkings to enable new functionality.
Sometimes, though, we can get too focused on the big features and forget to also improve the smaller parts of the software – those minor annoyances that aren’t a big deal in isolation but can be frustrating when encountered every day.
To address those, this summer we’re trying something a little different. Rather than spend months on some significant new feature, we will be releasing one new feature every week for twelve weeks. That’s twelve new features in three months. Better still, these features have been sourced entirely from customer requests and include some of our most requested features.
And we’re starting this weekend!
The First Weekly Feature – Batch Manage Attributes
Over the weekend we will release the first of our twelve summer features – the ability to batch add, edit, and delete equipment attributes. From the equipment list, select multiple equipment. In the action bar that appears, click “Attributes”, then one of “Add”, “Edit”, or “Delete”.
A bonus feature has snuck into this release as well – you will be able to add new attributes “on the fly” (assuming you have the permission to manage project settings). This includes when importing equipment – no more canceling out of an import because an attribute you need isn’t in the list.
Upcoming Weekly Features
In addition to batch managing attributes, the following features will be released in June and early July:
Report generator table of contents
Batch change test attempt status
Project dashboard PDF
Copy meeting agenda and minutes between projects
We’ll announce more features as we get closer to their release, and each week we’ll post a short blog post about that week’s feature.
Coming Soon: A New Way to Track Feature Requests
If you’ve participated in one of our webinars or monthly trainings, or talked to anyone on the team for long, we’ve probably asked for your feedback and suggestions. That’s because we are deeply committed to building a product that solves your problems before anything else.
That commitment may not always be as apparent as it should be because we don’t always communicate what we are doing with those suggestions.
We want to solve this. Starting later this summer we will be rolling out a new portal where you can make feature requests, see others’ suggested features, and vote on the features you like. You’ll also be able to see responses to requested features from the development team. We’ll be indicating whether we plan to implement a requested feature. Estimating timelines is notoriously difficult with software, but in time we hope to even include estimated delivery dates for some features.
We are happy to announce beta availability of the checklist upgrade!
The checklist upgrade replaces checklist sections with new “Group” pages and updated “Batch Add” and “Copy from Account” functions. In combination, these features give you more control of, and visibility into, your checklists while not losing any of the benefits you currently get with sections.
This brief video gives an overview of the changes you’ll see when upgrading a project.
Once a project is upgraded you’ll be able to do things that weren’t previously possible, such as:
Batch reassign all the checklists assigned to the Electrical Contractor.
Print the list or detail of all checklists assigned to the Mechanical Contractor.
View a single page containing all lines of all checklists with status “Incomplete”.
Customize the name of checklists you create through the “Batch Add” process.
And much more…
For all of the nitty-gritty details of the checklist upgrade, please read our Checklist Upgrade Guide.
What Do We Mean by “Beta”?
By beta we mean two things:
An organization must request access to the checklist upgrade and be added to the beta list before they are able to perform the upgrade.
Although we are not aware of any specific issues, there may be limitations or bugs during the beta period, and additional features may be added later.
If you are interested in upgrading your projects during the beta period, please contact us at support@cxalloy.com.
Other Improvements
This checklist upgrade launch was part of our version 4.21 release, which went out last weekend. The release included a handful of other features as well, including showing issues and files per-line in the checklist and test PDFs. Read the Release Notes for all of the updates.
Coming Up: Customer Appreciation Summer
We are incredibly grateful to you, our customers, and we want to not just tell you that, but show you. To that end, we are making this summer a “Customer Appreciation Summer”, during which we’ll be delivering as many of your most-requested features as we can.
All summer long we will be regularly releasing new features based entirely on the requests we have gotten from customers. Sometimes improvements addressing small frustrations get pushed back in lieu of big updates – this summer will be all about all those little annoyances (don’t worry, they’ll be some big ones too!). We think you’ll love it and we’ll share more details soon.
CxAlloy is excited to announce a revamped approach to how we handle checklists. This upcoming change will give you greater control over creating, managing, and reporting on checklists.
Currently, checklists in CxAlloy are comprised of sections. While this allows for easier consolidation, it can often hinder your ability to effectively organize and report on checklists. Our new approach will aim to move away from checklists having sections by converting those sections into checklists themselves. By doing so we’ll be able to implement several new features that aren’t possible with the current system; specifically:
Allowing you to view and report on a list of only those checklist sections with a certain status or assignment. No more “Multiple Statuses”!
Allowing you to batch change the status or assignment of a set of checklist sections without having to change the status or assignment of other, unrelated checklist sections that happen to share the same parent checklist.
Simplified, more meaningful dashboard-level reporting.
An update of the batching system allowing the selection of multiple templates for a set of equipment, enabling you to create more than one checklist per equipment during the batch process.
Allowing the selection of multiple templates when copying to and from the account.
The creation of new “group” pages that show all the checklist sections for a given sort group on one page, and the subsequent printing of a given group page. For example, you could view all the checklist sections grouped under the “Mechanical” discipline on one page.
As we approach the release for this checklist rework, we’ll release several help articles to explain the specifics of the update, how to do some common tasks, and what you can do to prepare for these changes.
Importantly, conversion will be optional for existing projects, so the update won’t affect any ongoing work. On the other hand, if you want the new features you will be able to choose to convert existing projects on a project-by-project basis.
You can look forward to these improvements as we take the next few months to make this transition as smooth as possible. Keep a look out for more details, FAQs, and videos over the coming weeks and if you have any questions or concerns please get in touch at support@cxalloy.com.
This past year has been an exciting one for CxAlloy TQ, with tremendous increases in users, projects, and activity.
One thing that comes along with a great year like we’ve had is a commensurate increase in the demand on our software infrastructure, and the possibility of performance problems. We hit those a couple of times this year, but we’ve worked hard to not only restore performance every time, but actually improve it. That story continues with our release this week that dramatically improves the performance of file uploads.
As part of this I also want to introduce to you our new status page, status.cxalloy.com, that will not only give you information for any planned or unplanned downtime or performance issues, but also be a public accounting of our commitment to great performance by showing you real-time and historical information on the performance of CxAlloy TQ.
The Challenge
The usage we are seeing today is significantly more than what we saw a year ago, or even a few months ago. This chart from a few months ago gives a good idea of the increases we’ve experienced.
June 2017 saw 80% more activity than June of 2016 and 50% more activity than January 2017, just six months earlier.
We are of course happy to see CxAlloy TQ grow, but it can create performance bottlenecks. We firmly believe that your experience shouldn’t be affected by the success of our platform.
To achieve our goal of great performance at all times, we have to look at many areas. For us our biggest bottlenecks are:
Database access
File uploads and downloads
Mobile syncing
Consequently, we have made improvements in each of these areas.
Database Access
Databases are slippery beasts, and small choices can have huge impacts (both positive and negative). The first thing we did this year was work through all of our slow queries and implement optimizations. We are careful to optimize in ways that have only upside, as some optimizations can make one area better while making others far worse. We made huge improvements here, particularly with history and checklists and tests.
In addition, in late June we moved to a much more powerful database server (82 GB RAM!) with a newer version of MySQL to give us significantly more headroom than we arguably need. This allows us to all but eliminate hardware as a performance bottleneck.
File Uploads and Downloads
We’ve seen an incredible increase in file uploads since the turn of the year.
June 2017 file uploads were 4x more than February 2017.
Before our release this week, both file uploads and downloads passed through our servers. The more files, the more our servers have to do, and that additional work can make uploads slow and even impact the entire site.
One obvious solution to this increased volume is to deploy more servers. However, we thought there was an even smarter solution than that.
The key is to realize that ultimately these files are not stored on our own servers, but in Amazon’s cloud-based S3 service. We realized that if we could cut our servers out of the loop, so that you upload the files directly to their ultimate destination, and download them directly from there, then our servers wouldn’t have to handle that load at all. Uploads and downloads would be faster and the application would be faster.
The release this week does just that for uploads. Our internal testing shows uploads are often over three times faster due to this change.
By offloading that work to Amazon we benefit from their best-in-class capacity, speed, and reliability. And since we were already relying on these services before, this change is a clear win.
Mobile Syncing
Last year we dramatically increased the speed at which a project downloads to a mobile device by offloading much of the work to our servers. This change has created a huge benefit for our users over the old process. It works so well, in fact, that it highlighted another bottleneck: syncing.
Syncing is a complex process compared to the relatively straightforward project download. It takes significantly longer as well.
There isn’t a good way to offload this work to our servers like we did with project download. It has to be done on the device, which is sometimes subject to older hardware and poor network connectivity. Not ones to shy away from a challenge, however, we’ve been drafting plans to ease this sync burden.
Unlike the systemic change with project download, these changes are small and incremental improvements. We’ve already implemented optimizations on the server to increase the speed at which the server processes syncs. Future changes include:
Doing many small syncs that happen periodically in the background, even when you aren’t using the app.
For large syncs we will leverage our project download system to replace the stale data on the device with fresh, quickly-bundled data from the server.
Making Ourselves Accountable To You
One way we can ensure that we don’t step off the gas on performance improvements is to give you an unfiltered view into how well we’re doing. We decided to do just that: our new status page provides both real-time and historical data on application performance.
The Apdex graph shows both current (Day) and historical (Week and Month) performance.
This Application Performance graph uses the industry-standard Apdex metric to chart real-time performance. This simple metric measures how many requests are met under a defined time limit. We use a relatively standard value of 0.5 seconds as our benchmark.
This is a level of transparency we’ve never provided before, but I’m excited about it. It will drive us to be more disciplined in both maintaining and improving performance, and push us to do the the one thing that really matters: helping you to run your projects as effectively and efficiently as possible.
Celebrate the release of Areas Served with this classic scene from “You Got Served”
With our most recent update you can now define what areas equipment serves. You could previously record this information as an attribute, but having a dedicated place for it gives you the following benefits:
You can leverage the locations you have defined in the project by selecting any of your previously defined spaces, floors, zones, or buildings.
I would be remiss if I didn’t thank one of our customers that really wanted this feature and provided us with great feedback. They are engaged on a highly demanding project – one of the biggest projects in the world – and their insight helped us get this right, including allowing multiple areas served per equipment.
That isn’t too unusual, though. Almost all of our new features are influenced by our customers and users. If you have an idea for a new feature or a suggestion for improvement, please let us know by emailing support@cxalloy.com.
You can now attach files to checklist and test lines! We know that many of you have wanted to be able to more precisely link files to the specific line they relate to, and now you can!
Files attached to lines are still shown in the overall “Files” section of the checklist or test. If a file comes from a specific line we indicate that on the file, including a link to scroll you directly to the line it comes from.
On mobile, files attached to lines will be available in the “Files” section of the checklist or test. It is not yet possible to attach files to lines in our mobile apps. We are working on an update to the iOS app that will add this functionality.
This update is part of our 4.18 release, which includes a few other small additions including a fun one (what could it be? 🤔). You can read the details in our release notes.
iOS Support Site
We recently rolled out a new support site, support.cxalloy.com. The new site provides several advantages; search is perhaps the most important. With this new site we will be continually updating and expanding our support content. Our first update is the addition of iOS support documentation, which you can find here.
In Case You Missed It
Our prior release, 4.17, added several new features including the ability to attach files to meetings. Read the release notes.
Recently we have heard from many users that it was taking too long to load checklists and tests. We heard your complaints and started working on solutions a couple of months ago. Since then we have released several updates targeting checklist and test performance, with the most significant update coming out today.
You’ll find that checklists and tests now load much faster, with the average time coming down from upwards of 5 seconds to less than a second.
We are not done improving performance and will continue to make the site faster in our regular updates throughout this year. As always, please let us know how we are doing and where we could improve by emailing us at support@cxalloy.com.
In March we released version 4.16 of CxAlloy TQ. It was a moderately sized release in terms of new features, but behind the scenes it was one of the more extensive updates we’ve ever done. I’d like to give you a peek into the engineering that went into this update.
One of the marquee features of CxAlloy TQ is that we track every change to your data. Any time an issue status is changed, a checklist line is answered, a meeting is created, or anything else happens, we record the change and who made it.
Having a full history of every data change in the system has proven incredibly useful. We use it to power the syncing in our mobile apps and to dictate what emails we need to send (and the content of those emails). We’ve used it to rebuild the statistics for every project in the system (twice). And of course we use it to show you what has been happening in your projects.
Unfortunately, the code to get at all this wonderful data was… not great. In fact it was kind of terrible. It was hard to understand. Because it was hard to understand, it was difficult to update or add to. History code quickly got a reputation among the team. For years there was a comment in the primary file: “HERE BE DRAGONS!!!”.
Worst of all, it was slow. I’m sure if you ever spent time viewing project or item history you dealt with long waits. And that wasn’t just bad for you – because history didn’t work with the database in an efficient way, it meant that the database spent a lot of time getting history data. That could potentially delay other requests and slow things down for everybody.
Given all this we knew we needed a new approach. The issue is that it’s an inherently difficult undertaking. Our history table is massive, sitting today at over 125 million rows. That creates challenges for making efficient database queries. And each history item could potentially need information from any other table in the database. Add to that the need to convert raw change data into nice English sentences like “Jacob Terry changed the status of Checklist Section Controls from Not Started to Started in Checklist AHU-1” and you’ve got a pretty complex project.
Learning from History
After a lot of experimentation and false starts we landed on an approach that divided the code into three discrete tasks:
Finding the set of related items.
Finding the history for those items.
Converting those history records into standardized “Events” with all the necessary information for displaying them.
Now when you load the history for an issue we go through these three steps. First, we find all the items that are related to that issue. That may include issue comments and uploaded files. Then, we get the history records not only for the issue itself, but for those related items as well. Finally, we convert those history records into standard Events that contain all the information we need to show a nice sentence like “Jacob Terry changed the status of this issue from Open to Closed”.
By separating the history into these three tasks we’ve been able to optimize each part so that it runs much faster. It’s also made the code far easier to understand so that it is easy to add new functionality or improve existing functionality.
Events, Compounded
The real meat of our new structure is the concept of an Event. An Event is a standardized representation of a data change. It contains detailed data on the state of the record before the change and after the change. It contains the ID and name of any related items (i.e. issue “RVR-7-2”; checklist “AHU-2”). It also contains components of the sentence we show, such as the verb (“uploaded”, “added”, “edited”), preposition (“from Open to Closed”), subject (“Jane Doe”), and so forth.
Some of this information (such as the name of an item) requires database lookups. We use fast, efficient queries against primary keys to get that information, and we cache the results so repeated requests don’t require a second trip to the database.
We also created a second type of event, a Compound Event. Compound Events are what you see when you view Project Activity. Compound Events represent a group of similar Events. We group Compound Events not only on the nature of the event (adding an issue comment vs. answering a checklist line) but also on when they happen. If you answer checklist lines in quick succession, for example, those will get grouped together into one Compound Event. If you answer one line in the morning and another one after lunch, that probably won’t get lumped into the same Compound Event.
Compound Events are great for a few reasons. On the engineering side they don’t require all the database lookups that regular Events do so they are even more performant than Events. We can also adjust the time-based grouping to whatever interval we want (a minute, an hour, a day, etc.) so it gives us a lot of future flexibility to create things like weekly activity summaries.
On the UI side they allow you to get a sense of what’s been going on in your project without overwhelming you with a giant list of events. You can then selectively expand the Compound Events you are interested in to get more detail.
Additional Benefits
Our overhaul delivered the biggest benefit we were looking for: improved performance. But we also were able to leverage the new, superior code structure to add in a lot more improvements.
Previously we hid checklist and test line changes. We now show all changes, including checklist and test line changes.
Previously we hid changes that happened if something was a draft, but related events (like commenting on a draft issue) would still be shown. Now we hide those events as well.
We’ve added many more filters to the project activity page.
Previously activity for a person was limited to only the past seven days. Now we show all activity.
Previously the history included in PDF reports was less detailed. Now it shows the exact same information as shown on the web.
And that isn’t even all the improvements!
History of History
It took us a long time to make this happen. The first code for this new approach was added in October of 2015, and we had been discussing it for quite a while before that. For all those that waited through long load times when viewing project activity or other history, thank you for your patience.
Back with version 2.2 we added filtering to the equipment list in the iOS app. This was a great help users to drill down to just the equipment that they were working with. It worked so well that we decided to bring list filtering everywhere in the app.
Getting Started With Filters
To use filters, look for this icon at the top of a list.
In this example, I’ll be filtering down our Construction Issues list to find a specific issue that I’m looking for. As you can see from our newly-added list counts, we have 93 construction issues currently logged. Tapping this button will bring up the filters screen.
The filters screen will look different depending on if you are filtering issues, tests, etc. If you select a filter, you’ll be presented for the options for that filter.
So, for example, if we wanted to get all of the issues tagged with the “Mechanical” discipline, we’d tap “Discipline” in the Filters list and then we’d select “Mechanical”. You can even select multiple options for each filter.
Before we apply the filter, let’s add one more constraint to our search. We know the issue that we’re hunting was due sometime last September. So let’s go to the “Date Due” filter and take a look at our options.
Like the CxAlloy TQ website, we have a few presets to get us started with dates as well as the ability to define custom date ranges. Since we’re trying to find the issue that was due last September, we’ll set the “Start Date” to September 1, 2016 and the “End Date” to September 30, 2016. Now we’ll go back and apply our filters.
Eureka! We found the issue we’re looking for! We also see that the issue was never closed. Time to follow up!
This was a simple example but filters are powerful tools for creating custom views of your data. For example, if you wanted to find all of your open issues, you could filter by issues assigned to you and issues that have any status but “Closed”. Similarly, if you wanted to find all issues for a certain room, you could filter by “Space” and get just the issues you need.
We’re looking forward to see how you use filters to get a better look at your data. As always, if you have any questions or suggestions on how to make filters even better, send us an email at support@cxalloy.com.